Posts

Showing posts from February, 2021

Clicker dies

Image
I have always wanted to have a go with a clicker die but had mistakenly thought that I would need a heavy duty press. With time hanging heavy on my hands because of lockdown I thought I would buy a couple of small dies and have a go. I bought one online and while I was waiting for it to arrive stuck together about 8 layers of scrap leathers with PVA to make a pad about an inch thick. The die arrived and I tried it in my bench press but without success and so used a hammer and my scrap pad and gave it a few hefty wallops. That worked OK. The die is mounted in a wooden block and has handy holes to poke through to release the leather. This particular clicker die makes a figure of eight that when folded and linked together forms a strap or lightweight belt.  Clickers were the highly skilled people in the shoe factories who cut out the pieces of leather using a metal pattern. As the blade of their knife touched the metal pattern it would click - giving them their name. The left over leather

U3Aleathercraft

Image
  WET MOULDING LEATHER Struggling to overcome my lack of motivation during yet another lockdown I decided that the best way to get started was to try something new so I bought a mould to produce a paw print. I have tried wet moulding in the past but I was not very satisfied with the outcome. Besides I had a lot of small pieces of leather that needed to be used for something. The two part mould is 60mm in diameter. I started off with some pieces of belly vegetable tanned tooling leather. Belly is very stretchy so should be good for moulding. I cut a circle to size and soaked it for about 10 minutes. This was then clamped between the two moulds using a G clamp making sure that the leather was the correct way round.  I wasn't sure how long to leave it in the clamp so I left it overnight to dry. However, I have since experimented with various times from immediate release to 30 minutes and have found that 5 minutes works fine. When the leather is first released it has a darker backgroun

U3Aleathercraft

Image
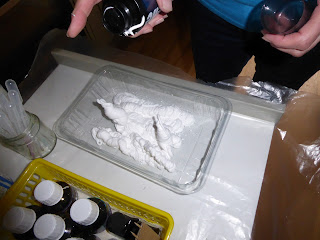
MARBLING LEATHER   Marbling is something that you can easily do at home and it doesn't need any specialist kit. I would recommend printing on paper first and then when you are confident with the process switch to leather. So here is what you need if you would like to have a go: Lots of newspaper or a sheet of plastic to protect your work surface (this can get really messy!) Shaving foam (the cheapest that you can find) Coloured inks Cocktail sticks Some corrugated cardboard Cartridge paper & Vegetable tanned tooling leather for printing on A plastic tub Right, let's get started. Spray the foam to cover the bottom of the plastic tub. About 1" or 2cms deep will be fine. Use a straight piece of cardboard to get an even flat surface.   We used a pipette to pick up the drawing ink but you can use a straw or cocktail stick and then tap it so that it splashes onto the foam.  Repeat with a variety of colours. It is best to use a different straw or cocktail stick for each colou

U3Aleathercraft

Image
  Making a medieval book. I have been trying out new things as a way to keep myself motivated during this seemingly never ending period of enforced isolation. This is a photo of the finished book for which was made for a friend of mine from Primary school. We discovered each other through a Facebook group for people interested in the history of our old home time. My friend is interested in calligraphy and that is what he intends to use this handmade book for. When it arrived his grandson thought that it had come from Harry Potter. The starting point was to fold together 4 sheets of A4 computer printing paper in half creating a "leaf" of 8 A5 pages. 25 "leaves" were carefully clamped together making sure that the spines were all in line. I drilled through the entire block six holes and stitched through using a strong twine. Luckily I had saved all those short scrap pieces of thread used for other projects and tied each one off. The spine was then covered with a heavy