Making a medieval book.
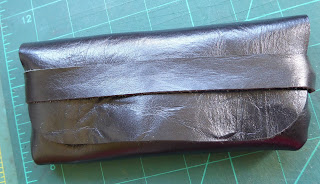
I have been trying out new things as a way to keep myself motivated during this seemingly never ending period of enforced isolation. This is a photo of the finished book for which was made for a friend of mine from Primary school. We discovered each other through a Facebook group for people interested in the history of our old home time.
My friend is interested in calligraphy and that is what he intends to use this handmade book for. When it arrived his grandson thought that it had come from Harry Potter.
The starting point was to fold together 4 sheets of A4 computer printing paper in half creating a "leaf" of 8 A5 pages. 25 "leaves" were carefully clamped together making sure that the spines were all in line. I drilled through the entire block six holes and stitched through using a strong twine. Luckily I had saved all those short scrap pieces of thread used for other projects and tied each one off. The spine was then covered with a heavyweight sheet of A4 paper glued along the spine with PVA glue and allowed to dry overnight.
The next step was to cut a stiff piece of card slightly wider than the spine and bend it in a shallow curve. 3 pieces of thick leather were glued on top of each other and when dry skived down to match the curve. The card and leather were glued together and allowed to dry. 5 thin strips of 4mm leather were glued to the outside of the spine.
The cover was made of 2 pieces of 4mm vegetable tanned tooling leather. The front cover was decorated with a stamped motif.
The spine part of the outside cover was made from 1mm vegetable tanned calfskin wet moulded over the card/leather spine. Once this had thoroughly dried overnight all three pieces making up the spine were dyed with a mahogany coloured antique gel. 4 billets were cut from 2.8mm vegetable tanned tooling leather and stamped with a Celtic knot pattern for the front 2 and my makers mark on the back pair. A couple of keepers were made from the scrap offcuts. These were treated with the mahogany antique get too. Two buckles were fitted and rivetted in place.
ASSEMBLY
Time to put it all together. In a change to my usual practice I decided to glue the three pieces of the leather cover together instead of stitching using a contact adhesive. A few easy rivets were used too - as much for decoration as security. The billets were glued on and riveted too at this stage.
As you can see I hit the rivet setter a bit too hard and left a witness mark on the billet. Think of it as a "feature" and just testifies to its hand crafted status!
Once the cover assembly was completed it was time to break out the Ecoflo water based dyes to get that aged effect. This was built up of successively darker shades and stronger solutions starting with a diluted light brown and finishing with a swirled coat of a chocolate brown.
To stiffen the covers I cut two pieces of greyboard which I covered with handcrafted marbled end papers. These were then used to secure the first (and last) page of the book and glued in place. Once this was dry two coats of Edgecoat were applied to the burnished edges.
Brass decorative corners were crimped into place before massaging in three thin coats of beeswax protective finish (Aussie) over a period of 4 days.
Finally the finished item:


Alan, you are a true artist. Apart from teaching Beadwork I also teach Calligraphy at Mansfield U3A. I have Facebook Groups set up for both of these and we tend to stay in touch that way. I have never set up a Blog before and what advantage does it give over Facebook Groups?
ReplyDeleteThank you for you feedback. Lots of our members don't want to use Facebook so with a blog I can email them a link. A blog also allows me to write a longer piece with p[hotos embedded in the relevant position.
Delete