Posts

Showing posts from May, 2021

Minimalist wallet

Image
This week's project is making a minimalist wallet - useful for tucking into your shorts while you are enjoying the summer weather. I have used a remnant of furnishing leather scavenged from an old leather armchair but you can use whatever leather that you have available. as you can see I made one earlier from vegetable tanned tooling leather.  If you are running short of larger pieces of leather you could even make the two inside pieces from a contrasting colour. This is the pattern for the three pieces that you are going to need. The outer is 9 inches by 4 inches. The cash holder is 5 & 3/4 inches by 3 inches. (I have just noticed a mistake in my pattern as there shouldn't be a notch cut in the cash holder). Finally the card holder is 4 inches by 2 and a half inches. These are the three pieces cut to size. Accurate cutting with exact right angled corners is most important. If you are using vegetable tanned tooling leather this is the point to stamp any decoratio...

Using rubber stamps and permanent ink

Image
  This week I am looking at decorating leather using a permanent ink pad and rubber stamps. Although I have used a thin piece of vegetable tanned tooling leather this works just as well with some finished leathers providing they don't have a glossy finish. Tools needed are a craft knife or leather cutting shears, snap setter, permanent ink pad and decorative rubber stamps. Small paint brush and tub of water. Start by cutting the leather to shape. Overall size is 9 inches by 4 inches. It can be bigger but not smaller. Find the centre of the short edge - this is 2 inches in on my piece and then mark two inches from the end on the long edge. Cut to shape. With a straight edge make a crease across the base of the triangle formed at each end using a bone folder. If you haven't got one use a stylus or a "dead" biro. Then make one diagonal fold joining the two triangles. As you can see I have already applied water to each of the folds not only to help them show up in the pho...

What do these do? What are they called?

Image
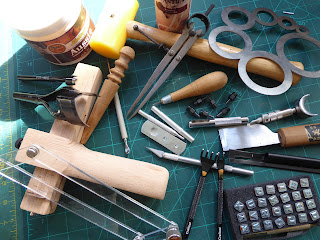
In this blog I will look at what the various tools we use the most frequently and what they are called as well as what they are used for. The first tools that you will probably need to use are the ones we use for cutting out your pieces of leather. These are a folding Stanley knife or box cutter A craft knife A pair of leather cutting scissors or shears. Note the blunt ends which allow you to cut into corners and right to the end of the blade. Another cutting tool that you will use to straighten the edges of two pieces of leather sewn together is the Japanese knife.  It can also be used as a skiver. A much safer option for skivving is the Safety Beveller.  This has a curved end and is best used at a 45 degree angle to the edge that you are skivving. Make sure that the leather is dry before you start skivving to get a really clean cut. Those shavings can come in handy if chopped up and used with PVA glue you can make leather mache to fill gaps in your work. This is the tool to ...

Making a small camera case

Image
In this blog I want to look at using up some offcuts to make a small camera case but the design could be used for other items. To make this case you will need a craft knife, ruler, bone folder, a mallet, pricking iron, two harness needles, thread and a snap setter. If you are using tooling leather you could also use some decorative stamping tools and dye (I have used an antique saddle tan gel). Finished with Aussie (beeswax). The first stage is cut out the pieces of leather. I have chosen a fairly thick piece of tooling leather to give maximum protection to my camera but you could use something a bit thinner. It needs to be stiff enough to hold its shape once assembled.  I haven't given actual sizes as these will be decided by the dimensions of your camera.  I have wet formed the largest two pieces by using a bone folder to form the creases along lines that are 5mm larger than the length, width and depth of the camera. My "bone" folders are actually made of plastic and ar...