In this blog I want to look at using up some offcuts to make a small camera case but the design could be used for other items.
To make this case you will need a craft knife, ruler, bone folder, a mallet, pricking iron, two harness needles, thread and a snap setter.
If you are using tooling leather you could also use some decorative stamping tools and dye (I have used an antique saddle tan gel).
Finished with Aussie (beeswax).
The first stage is cut out the pieces of leather. I have chosen a fairly thick piece of tooling leather to give maximum protection to my camera but you could use something a bit thinner. It needs to be stiff enough to hold its shape once assembled. I haven't given actual sizes as these will be decided by the dimensions of your camera.
I have wet formed the largest two pieces by using a bone folder to form the creases along lines that are 5mm larger than the length, width and depth of the camera.
My "bone" folders are actually made of plastic and are sold for papercraft.
To use the bone folder to create a crease use a small brush loaded with water to wet the
crease line on the flesh side (inside) of the leather. Use a ruler to ensure you get a straight line. Press hard.
While the leather is still damp I have started decorating those areas that will remain visible when the case is closed.
I have also taken this opportunity to mark the stitching line.
The next stage is to punch the stitching holes and this is best done once the leather is dry.
Always dye the leather before stitching it together.
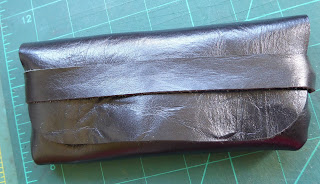
The belt loops were sewn on first.
Before sewing the body in place the two snaps were mounted in place.
The body is stitched to the back and up the sides.
With this in place the two snaps are fixed to the flap.


Comments
Post a Comment