Making this purse will show you how to stitch round a curve, snap setting and use up those bits of left over finished leathers that you might have hanging around.
There are not many tools that you are going to need for this one:
A craft knife or leather cutting scissors
A three part snap setter tool kit
One 4 part snap
A 2 pronged pricking iron
Two harness needles
Thread
I have chosen to make the outside from a piece of vegetable tanned tooling leather so that I can decorate it but you can use whatever stiffish leather you prefer. The inside piece needs to be a stretchy flexible leather.
Start by printing off the pattern which should measure 18cms by 9cms.Draw a circle no smaller than 4 cms in diameter in the centre of one end. Draw round a bottle top or anything else of the right size if you don't have a compass. This opening for the coins can be bigger (up to 5 cms) but if it is any smaller you won't be able to get 50p coins in or out. Also 12mm from each end mark the hole for the snaps. I have transferred my paper pattern onto card but if you have a steady hand you can mark
round the paper pattern.
PLEASE NOTE The outer piece doesn't have an opening or the two holes for the snaps. I have chosen to cut the inner piece slightly
larger as this help to give a better alignment when the two pieces are sewn together. I will trim off the surplus at the end and get a clean edge.
I have used a split which will give me the necessary flexibility to accommodate the coins. If you are using tooling leather for the outer piece now is the time to do any decoration and
dyeing before dealing with the inner piece. It is also the point at which you need to mark the 3mm stitching line.
The blog about making a keyfob will remind you about casing leather, stamping and marking up a stitching line. Click here https://u3aleathercraft.blogspot.com/2021/04/keyfob.html The next stage is to set the snaps on the inner leather piece.
Make the holes for the snaps either with a punch or an awl.
Use the depression in the anvil to protect the domed shape of the snap while you use the first snap setting tool. Do not hit it too hard with the mallet as you may end up punching through the soft metal of the snap.
The other part of the snap set is straightforward. Use the depression in the tool to fit over the snap and turn the anvil over to present a flat surface to support the other part of the snap. Hammer into place.
The next stage is to prick the stitching holes. You can hold the two pieces together either with a few clothes pegs or with bulldog clips. If you use bulldog clips use some pieces of scrap leather protect your work from being marked by the force of the jaws. I have used an Ivan/ Tandy 3mm two pronged pricking iron.
I started off on the back of the purse so that if my last two holes are not quite the same as the others it won't be so noticeable on the back.
The keyfob blog covers saddle stitching technique. The length of the thread you are going to need is 3 times (and a bit) the total length of the line to be stitched. With a harness needle threaded into place at each end you are now ready to start stitching.
I have used a stitching pony as I am trying to sew and take photographs at the same time but it isn't strictly necessary. In fact when I wasn't taking photos I took it out of the pony and stitched freehand as I found it quicker.But you use whichever technique you find better for you.
Finish off by backstitching two holes to secure the threads.
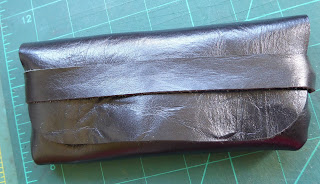
With the two pieces stitched firmly together the next stage is to trim off any waste and then burnish the edges. I then applied two layers of Edgeflex to mine but a burnished edge is all that is really needed.
I have finished the purse with a layer of Aussie but you could also use Supershene.


If you haven't got any snaps you could use a button sewn to the outside front and a loop of elastic or leather lace from the back to fasten it.
ReplyDelete